The Node.js version that Netlify uses by default for node builds (Netlify also supports Go, Python, Ruby, Rust, Swift, and PHP) is determined by the preinstalled version of your site's selected build image. On occasion, a build will run fine locally but will fail on Netlify because the node version used for builds isn't supported by your build tool or framework.
This can happen when you are trying out the latest canary releases of build tools like Eleventy and Gatsby. These releases sometimes need very new node versions.
In this post I'm going to show you a few common methods to explicity set a node version for your Netlify builds.
Method 1: Add an .nvmrc file to your project root and commit it #
Netlify uses Node Version manager (NVM) to manage the node versions it uses for builds. An .nvmrc file in your project root folder will tell NVM that you want to use a particular node version, rather than the one it sets by default.
The .nvmrc file only has one line: the version number e.g. 16.18.0 or one of the strings that NVM understands e.g. node for the latest version, or lts/* for the latest LTS version.
The .nvmrc file looks like this:
16.18.0Here's a way to create an .nvmrc file in the terminal specifying a full version:
echo "16.18.0" > .nvmrc
The above command creates a .nvmrc file and adds the version number 16.18.0.
Here's how to create an .nvmrc file specifying a major version:
echo "16" > .nvmrc
Or to create an .nvmrc file specifying the latest node version:
echo "node" > .nvmrc
There are other version values that you can specify too. You can learn more about those in the NVM readme.
My verdict #
I like this method because you can store the required node version in your repo where everyone involved can see it. You can safely commit this file because it doesn't contain any sensitive data. The .nvmrc file does only one thing, and it does it well.
Method 2: Add a build environment variable in the Netlify UI #
This method requires that you add an environment variable to your Netlify build settings. You can do this by adding it in the Netlify UI: Build & Deploy > Environment > Environment variables.
You can add an environment variable specifying a full version. For example:
NODE_VERSION and 16.18.0
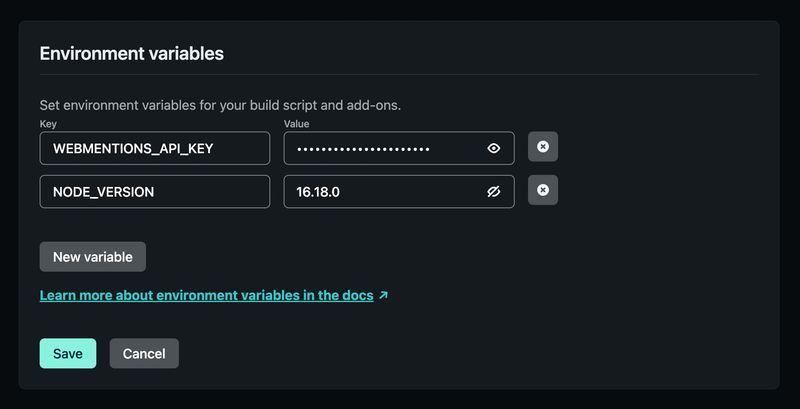
Or you can add an environment variable specifying only a major version, for example:
NODE_VERSION and 16
When specifying a major version, NVM will use the latest major version release e.g. 16.18.0.
You can also set one of the valid strings that NVM understands e.g. node for the latest version, or lts/* for the latest LTS version.
Note: when you build on Netlify, the build system doesn’t read .env files. That means you can't use an .env file to set the NODE_VERSION or other build environment variables. You are required to add them manually via the Netlify UI build settings, or to use one of the other configuration methods described in this post.
My verdict #
I don't like this method. You can sometimes forget it's there and be stuck with the same node version for your builds for a long time without realizing it (don't ask me how I know that). If you're working in a team, it's possible that not all members have access to the Netlify UI settings. Because of this, it might not be obvious to others that the node version has been explicitly set.
If you're going to specify a node version for builds, you should store the directive in your project repo where everyone who needs to can see it.
Method 3: Add a build environment variable in the netlify.toml configuration file #
With this method, you add an environment variable to a netlify.toml configuration file, under the [build.environment] section. This file is normally stored in the root of your site repository and is used to store build settings and deployment contexts. It can also be used to configure redirect and header rules.
The netlify.toml file uses TOML syntax and is structured like this:
[build]
  # The build output folder
  publish = "_site"
  # The build command
  command = "eleventy"

[build.environment]
  # Environment variables are set here
  NODE_VERSION = "16.18.0"
You can add an environment variable under the [build.environment] section specifying a full version:
NODE_VERSION="16.18.0"
Or you can specify any of the other valid NVM node version numbers and strings we spoke about earlier.
My verdict #
If your project is already using a netlify.toml file for configuration, then this method might be better than specifying a node version in the Netlify UI settings. It keeps the directive together with your other build settings where you and your team can see it.
If you don't lean heavily on netlify.toml for your configuration, it might make more sense to store the directive in an .nvmrc file as described earlier in this post.
Wrapping up #
In this post I've shown you three methods to specify the Node.js version for your Netlify builds. There are some other ways of doing it, but these are the most common.
However, I don't recommend specifying a node version for builds unless you have a good reason to. If you do it, make sure that you store this directive somewhere you and your team can see it. It can be easy to forget about and your builds will be locked into using this version until you remove or modify it.
If you liked this post or if you have anything to add, please reach out to me on Twitter or send me an email.
Further reading #
Take a look at these resources to learn more about Netlify builds and NVM.
Netlify build configuration overview
All about file-based configuration using the netlify.toml configuration file